Friday, January 30, 2009

Golden Fun-Filled Friday

Well its another Friday! Time sure flies from week to week. This week Jen challenged me to make a card with precious metals in mind. Initially this was pretty difficult for me but once I started going I couldn't stop myself! Here is what I came up with for this challenge :


I heat embossed the sentiment in gold, used my gold metallic marker on the edges, gold ribbon, and gold embellishments. For the bottom of the card I used one of my border punches then colored over it with my gold metallic marker. It was kind of fun. The whole idea came from the piece of pattern paper I found. I thought the colors went so well with gold. I also love paisley prints, but never seem to use them - I don't know why. Don't forget to check out Jen's card for this week.

Supplies:
  • sentiment by Paper Inspirations
  • card stock by Bazzill, pattern paper by Creative Imaginations - Terra Cotta Paisley
  • miscellaneous - Ranger princess gold embossing powder, heat gun, ribbon by Joann's, gold embellishments by Oriental Trading, gold metallic marker by Pen Touch, Fiskars lace border punch.

Did you come up with anything for this challenge? Do you have any suggestions for future challenges you would like to see? Let me know I am always up for something to get my creative juices flowing.

Hope you have a wonderful weekend - any big plans? It's my weekend to work so nothing for me.

Sunday we will announce our next Fun-Filled Friday challenge so make sure you stop in to see what it is.

Happy Crafting,

Kimmy

Thursday, January 29, 2009

Birthday wishes for dad

My Dad's birthday is today! He is a huge fan of fishing so here is what I came up with for him:

Of course I used my Nesties on this card :) It was a pretty easy card to make. The sentiment is actually a lot longer, but I cut out the part that I wanted. I used my white glaze pen to add a little touch to the splash the fish made. I hope he enjoys it.

Happy Birthday Dad!

Supplies :
  • stamps - image by DRS Designs, sentiment by Paper Inspirations
  • paper - card stock by Bazzill, pattern paper by Chatterbox Scrapbook Walls Varsity Argyle
  • miscellaneous - Prismacolor pencils, mineral spirits, EK Success paper shapers corner stone punch, Spellbinders Nestabilities, eyelets by Oriental Trading, Versa Fine black and brown inks, white gelly roll Glaze pen by Sakura.
I hope you enjoyed yesterday's post about the Cuttlebug. It was fun to look though some of my supplies and find something to write about.

Stay tuned for tomorrow's metallic Fun-Filled Friday.


Happy Crafting,

Kimmy


Wednesday, January 28, 2009

What's that Wednesday????

I have decided to start a new segment on my blog "What's that Wednesday?". Want to know how that works? Thinking of buying something but now sure if it's right for you? Just want to know the pros and cons to a product? Want to try a new technique, but not sure? Is there an easier way to do something? Well I am here to help. I know I have tried tons of different types of products in my many years of crafting. Some I have bought simply because they were on sale, or cheap. Other items I just had to have. I have been both very excited and disappointed my different products I have. Some items took some getting used to and now I love. I thought maybe I could help some of you out there save some money and time by sharing some of my product and technique reviews.

I am going to start this off with a favorite product of mine :

The Cuttlebug by Provo Craft

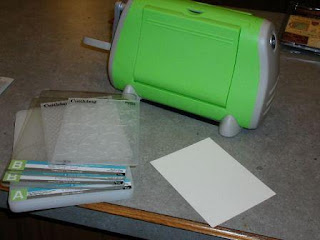
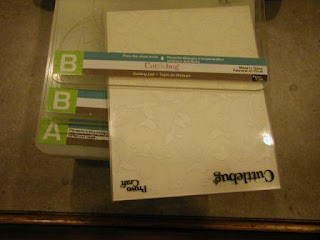
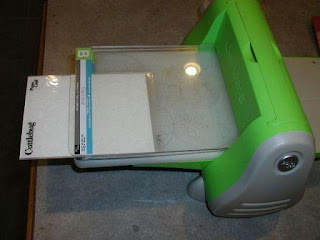
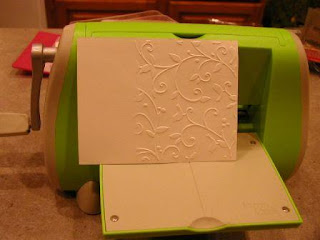
The Cuttlebug is basically a portable machine for die cutting and embossing. You have to purchase the embossing folders and dies separately. It folds up when not in use and has a pop up handle for easy transportation. When you open your Cuttlebug it has a suction feature the holds it in place on your table or counter top. I have only used the Cuttlebug embossing folders, but I know there are several other brands that are compatible, you just need to know the "recipe". I have used Cuttlebug, Sizzix, and Spellbinders dies without any problems. The nice thing is the crafting world has figured out ways to use this with so many other brands and items that it's so versatile. The Cuttlebug comes with 4 plates to put your materials between; 1 A plate, 2 B plates, and 1 C plate. The order of the plates, dies/embossing folder and your material being cut make up the "recipe". I have heard of several people having one of the plates crack after alot of use. I don't know how to prevent this, but the plates are pretty cheap to replace.

Here are a few of the recipes I frequently use :
(I wrote these to be placed face up in the order you read them)

To use with your Cuttlebug Embossing folders
A Plate
B Plate
Embossing folder (with paper in it)
B Plate

To use with Cuttlebug Die
A Plate
B Plate
paper
Cuttlebug Die
B Plate

To use with Spellbinder Nestabilities
A Plate
B Plate
paper
Nestabilities die
C plate

***NOTE : I like to see what I am cutting so I like to cut with my Nesties face up. I am also trying to do all of the "cutting" on my B plate - just my preference no special reason. The recipes can be placed in different order.***


Many other recipes can be found online. The internet is so full of information and tutorials. Check out You Tube for video tutorials - they are very helpful.

I will admit I have had times where this item sat on a shelf collecting dust, but lately it's right next to me. I also will honestly say this is not a product I would expect someone just starting out to purchase right away, but if you can afford it I highly recommend it. I was lucky enough to get mine for a birthday gift :)

Just a couple of money saving tips. If you are looking to buy a Cuttlebug remember Michaels and Joann's offer 40% off coupons almost every week on non-sale items. The Cuttlebug usually retails for about $79.99. For Spellbinders Nestabilities I suggest the http://www.ucutathome.com/ online store. You can sign up for the V.I.P. club and receive a 40% off coupon in your email monthly. Hobby Lobby also has weekly coupons, but I don't have one close enough to shop at frequently. You can always check store ads online, or look for sales at online stores. I always try to use a coupon to save some cash.

Please let me know if there is anything you would like to see reviewed or have questions about. If I don't have it or have never used it, I'll do some research for you - or if it's something on the more affordable side I'll pick one up and let you know what I think. If you have some tips or tricks you want to share please let me know I am always excited to learn something new. If you disagree with my reviews (or strongly agree) please share, someone may learn from something you have to say. Feel free to email me.

Next week I am going to share with you a product that also works with the Cuttlebug, I am very excited about this one.

**Remember these are my opinions on how things work for me, you might love something I don't - it just depends on your style of crafting. ***

Happy Crafting,
Kimmy

Tuesday, January 27, 2009

Sorry no project today....

Sorry I don't have a project to share with you today. I was very busy this past weekend. I was gathering up projects for a couple of design teams that I decided to apply for. Wish me luck:) it was fun looking through the progression of my work. I have improved from my first card. I wanted to share with you all a new segment I starting tomorrow, I'm calling it "what's that Wednesday".. Here is what it is all about.

Thinking of buying something but now sure if it's right for you? Just want to know the pros and cons to a product? Want to try a new technique, but not sure? Is there an easier way to do something? Well I am here to help. I know I have tried tons of different types of products in my many years of crafting. Some I have bought simply because they were on sale, or cheap. Other items I just had to have. I have been both very excited and disappointed my different products I have. Some items took some getting used to and now I love. I thought maybe I could help some of you out there save some money and time by sharing some of my product and technique reviews.

I'm not sold on the name but it will do for now - let me know if you have any suggestions. I hope you check in tomorrow for my first review.

I promise next week will have more projects.

Happy crafting,
Kimmy

Sunday, January 25, 2009

What's gold, silver and bronze all over???

Riddle for the day : What's gold, silver and bronze all over???

This weeks Fun-Filled Friday challenge!

That's right this week Jen's challenge is a Precious Metals challenge. So we have to use golds, silvers, bronzes (is that a word???), and metal embellishments. This should be fun and very elegant! Make sure you stay tuned Friday to see what we come up with.

Do you enjoy using metal embellishments, or metallic colors on your work? If you do please play along - if not why don't you give it a try this week.

Well, I have a busy week ahead of me - guess I better get going on this challenge!

Happy Crafting,
Kimmy

Friday, January 23, 2009

Get Well Riley!

It's Fun-Filled Friday! This week was a Riley challenge. I took it to the extreme and made a whole Moose Week. I hope you aren't sick of them yet. What's the plural of moose anyways - mooses? Today's card is also my "get well" card of the week for my friend Monica. I am making her a card a week until she recovers from her surgery. Here is what I came up with :


This card is using alot of the same elements you have been seeing all week - Nesties, border punches, and of course a Riley Moose. This one was super easy to make too. I actually started with my paper and colored my image based on that. I love how the coloring came out too. I used my Nesties Labels 1 on this one. I added some stickles to the pattern paper to bling it up a little.

Supplies :
  • stamp - Hanna Stamps Sick Riley
  • paper by KI Memories "it's a girl paisley", card stock by Bazzill
  • miscellaneous - Spellbinders Nestabilities Labels 1; Stickles; Prismacolor pencils; gamsol; Martha Stewart Doiley Edge Punch;

So did you join out Fun-Filled Friday challenge this week? I would love to see what you came up with. Let me know if there's anything you would like to see me try. I love to be challenged!

I am very happy to say I am doing well with my resolutions this year. I'm back on my diet, crafting more often and keeping my blog updated. And I was getting back into working out again until I slipped shoveling snow and then again in the garage. I am a big klutz and me and ice don't get along all that well :) My foot, arm, and knees have been recovering from my falls so I am taking it easy with the working out for a few days.

Hope you have a great weekend!

Happy Crafting,
Kimmy

Tuesday, January 20, 2009

Moose Week Day 2

Here is another moose card for you :

I made this card with my Mom in mind. It's actually for her birthday. This is so her! Every morning she has her cup of coffee and a cupcake :) Not a big, yummy, homemade cupcake, just a small Hostess sized cup cake. This one was also simple, I used my Nesties and based the colors off of the cupcake ribbon I have been itching to use. I hope my Mom likes her birthday card - and notices the similarities:)

Supplies :
  • stamps - Hanna Stamps Coffee Riley Moose; Stampin' Up Riveting "it's your day"
  • card stock - Bazzill, the glittery card stock I don't know the manufacturer of
  • miscellaneous - ribbon by Michaels; black Versa Fine ink; Prismacolor pencils; gamsol; Spellbinders Nestabilities Labels 2 set, circles, and scallop circles; Cuttlebug; Sizzix crease mat; Fiskars Threading Water border punch; red Stickles
Here's a close up of my sentiment, and you can see the cute ribbon. I added red stickles to the cherries on all the cupcakes. I also put it on Riley's cupcake too.


I decided to cut down on my "how I made this card" segment of blog posts. Let me know what you think? Would you prefer detailed instructions for every card? Hope you are having a great week. Tonight is my last night of work then 4 days off - I can't wait!

Happy Crafting,
Kimmy

Monday, January 19, 2009

Moose Week!

Since this week's Fun-Filled Friday is to use Riley images, I decided to have a week of full of Moose cards. It may be silly, but I was having so much fun coloring them the other day I thought why not make a few extras.

Here is Monday's Moose card :

My DH was nice enough to let me purchase some Nesties for Christmas. I got a full circle set, and the Labels 1 and Labels 2 sets. I was so excited to play with them - used them over and over again (so you will be seeing alot of them). One of my girlfriends had heard about using the Sizzix Crease mat with your Nesties to cut and emboss all in one run through your Cuttlebug. I must say it worked very well. I recommend trying it. I had to play around to get the right size shim and I always run it back and forth in my Cuttlebug a couple times, but that's just what I do.

You can't see it very well in the picture, but I cut and embossed the scallop circle right on the card base, then again on the pattern paper. I then placed a lighter blue card stock on the inside of the card. Next, I colored and cut out Riley and glued him to the center of my lighter blue card stock. I also used my Just Rite stamp set to stamp the Relax sentiment. This was a very simple and quick card to make.

Supplies :
  • stamp - Hanna Stamps Coffee Riley Moose
  • card stock - Bazzill
  • pattern paper - Scrap Works pacific vibrant
  • miscellaneous - Prismacolor pencils, Gamsol, Nestabilities Scallop Circles, Cuttlebug.

Thanks for stopping by today. I hope you enjoyed today's card. I have had a busy weekend having to work Friday, Saturday, Sunday and now today and Tuesday. I work 12 hour shifts on midnights so my work days tend to drag. Well, check in tomorrow for another moose card I made this weekend. I am trying to keep up my 5+ posts a week - so if you have any suggestions or comments let me know.

Happy Crafting,
Kimmy

Sunday, January 18, 2009

Fun-Filled Friday Challenge Announcement.

Well, another Sunday is here and you know what that means - time for our Fun-Filled challenge announcement. This week I get to challenge Jen. I was looking around my mess of a studio trying to think of a good challenge and realized I have several stamps I haven't used yet. So I thought of my most recent purchase - Riley's. So this week it's time to get those Riley moose's inky. I bought a bunch from Hanna Stamps before Thanksgiving and still have a few I never used. I swear there is a moose for every occasion!

Hope you had a fabulous weekend. And make sure you check in Friday so see our Riley cards.

Happy Crafting,
Kimmy

Saturday, January 17, 2009

Cuttlebug Tutorial

CUTTLEBUG TUTORIAL

This is my first tutorial so I hope all goes well. I'm going to show you how I create a card with 2 different Cuttlebug embossing folders. So lets get started.


Here are the supplies you will need:
  • Cuttlebug and both your B-plates
  • 2 Cuttlebug embossing folders
  • card stock
  • Scor-Pal (optional)


Step 1

Cut your card stock to the size you want for your card (I usually cut mine to 4" x 5 1/4" so that there is a bit of a mat when I center the card base on the card front).


Step 2

We will be using the following Cuttlebug formula for this :
A-plate, B-plate, embossing folder (with paper in it) and B-plate. (as shown below)


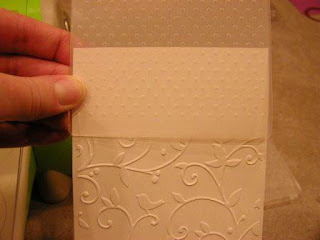
Now put your card stock in the embossing folder and use the recipe from above. I try to line up my embossing folder along the edge of the Cuttlebug so that I can keep my embossing folder as straight as possible. I then put my B plate on top but make sure the part I DON'T want to emboss is sticking out of the plates (as seen in the picture below). Now run it through.


This is what you should have when you take out your card stock.


Step 3

Line up your unembossed side of card stock in the 2nd folder. This probably is the toughest part because you want to make sure the paper is straight.


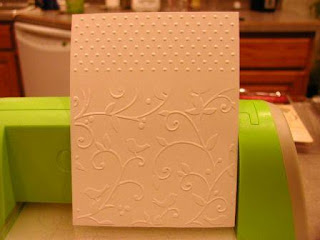
I then run it through my Cuttlebug leaving the extra paper sticking out of the plates like in the previous step. This is what you should have when you take out your card stock.


Step 4 (optional)

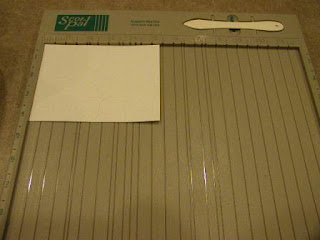
Now comes the optional part. You can now use your Scor-Pal to create embossed lines between the 2 different embossed portions. If you want to do this make sure you leave a little space between them when you run them through the Cuttlebug. Then placing the paper embossing side down line it up on your Scor-Pal.

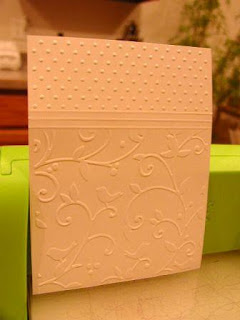
Here is what that looks like when you are done.


Well, I hope that was simple enough. What did you think? I really enjoyed trying it. If you have any questions let me know. Stay tuned next week I have a theme in mind... Any guesses on what it is? Hope you are having a wonderful weekend - and staying warm. It's been so cold here in Michigan.

Happy Crafting,
Kimmy

Friday, January 16, 2009

Fun-Filled Friday

Happy Fun-Filled Friday!

Well, this week Jen challenged me to make a Gate Fold card. Amazingly enough this was a new one for me. Here is what I came up with:

For this card I started with my image. I stamped it on smooth white card stock and colored it with my Prismacolor pencils blended with a colorless blender pencil (No gamsol!! Thought I would try something new). After that was done I realized it was a rather large image and had to figure out how it would work with a gate fold card. I decided to make my card 5 1/2" x 5 1/2". I then took a piece of fuchsia card stock and cut it to 5 1/2" x 11". Then I used my Scor-Pal to score it at on the 11" side at 2 3/4" and 8 1/4". Then I folded it to make sure both sides lined up. Next I cut 2 pieces of cream card stock to 2 5/8" x 5 3/8". Then I cut 2 pieces of light pink card stock to 2 1/2" x 5 1/4". Layered the light pink on the beige and then glued that on each of the front panels. Next I used a technique I saw on my friend Beth's blog using corner punches. Here is the link. Basically you cut out the corner punch to the size you need and glue it over the top of your corner (does that make sense?). So I punched and cut out the corner punch 4 times on the beige card stock. Then I glued the corner pieces on the 4 corners of the card front. Then I cut my image to making sure I cut out the flowers and stems so they appear to hang over the mat. Then I layered the cut out image on beige and then again on darker pink. I used the same technique with the darker pink card stock and the corner punch. I then glued my corner pieces to all 4 corners of my layered image. Then I glued my layered image to the left front panel of my card. Here is a partially open view of my finished card:

Supplies:
  • stamp - Serendipity Stamps (#L281)
  • card stock - The Paper Company
  • miscellaneous -EK Success Wrought Iron Corner Adorner Punch
Don't forget to see Jen's Gate Fold card. If you joined in our Fun-Filled Friday challenge make sure you post a comment with a link to your work. And check back Sunday for the next Fun-Filled Friday challenge announcement - My turn to pick the challenge. Are there any challenges you would like to see in the future? Let me know, I'm always looking for new ideas.

Do you have any big plans for the weekend? This is my weekend to work so I have to work Saturday and Sunday night, and I have to work overtime tonight so no fun for me. Well, enjoy your weekend and make sure you stop by tomorrow for my first tutorial! I hope it turns out alright.

Happy Crafting,
Kimmy

Thursday, January 15, 2009

With Sympathy...

Well, I must be a glutton for punishment. After struggling with one Sympathy card swap I joined another. Of course I had the same trouble coming up with a design as I did the first time. My friend Kathy and I had taken a class at a local stamping store and I tried to get some inspiration from the different samples there. Then I came home and looked through many many many galleries trying to get ideas of what I wanted to do. This is what I came up with :

I knew I wanted to use vellum, and I really have been wanting to try the technique where you use 2 different embossing folders on one sheet. So I decided to go for it. (I will post a tutorial on how I did this another day). I didn't think to look for a tutorial or anything I just jumped right in. I learned quite a few things while attempting this, and used up a bunch of my scraps.

Here is a different angle so you can see the embossing a little better:

I guess I'll explain how I made this card... I grabbed a beige card stock and ran the lower 2/3 of it through my Cuttlebug using the Birds and Swirls embossing folder. Then I ran the upper 1/3 of it through my Cuttlebug using the Swiss Dots folder. Next I took a piece of vellum and cut it to 4 1/8" x 3". Then I used my Martha Stewart Lattice border punch on both sides of the vellum. Next I cut a strip of light beige card stock to 4" x 2". Then I stamped my sentiment in gold ink centered on the strip of light beige card stock. Then, I centered my card stock on the vellum and glued the vellum centered between the two embossed sides. Then I glued the whole card front to the center of my A2 card base.

Supplies:
  • stamp - All Night Media Say it with Stamps "with sympathy"
  • paper - The Paper Company, vellum - Paper Reflections
  • miscellaneous - Cuttlebug, Swiss Dots embossing folder, Birds and Swirls embossing folder, gold Versa Color ink, Martha Stewart Lattice Border Punch
Sadly, I am not overly excited about this card, I think this would have made a better Wedding/engagement card, but it's what I came up with. I also learned a new technique. What do you think? Have you made any sympathy cards you would like to share? If so please leave a link to yours in the comments.

Stay tuned for tomorrow's Fun-Filled Friday card. And Saturday I'll try to post a tutorial on what I learned using 2 embossing folders.

Happy Crafting,
Kimmy

Tuesday, January 13, 2009

For Monica


My dear friend Monica is recovering from surgery right now. Right after Christmas she was taken to the hospital for what was first diagnosed as a kidney stone. What actually happened was that part of her intestine had collapsed. She had to have surgery to get rid of the collapsed portion of her intestine and sew the rest back together. She was in the hospital for almost 2 weeks and is finally home. She has a long recovery ahead of her (4-6 weeks). So I figured I could start sending her some cards. I am going to try 1 a week - only because I'm making them. Here is the first in my for Monica series.

The whole idea behind this card was from the ATCs I showed you yesterday. I had 10 to make but for some reason stamped and colored 12 images. I really can count - I swear:).

To make this card I started with my extra ATC images. I inked the edges and layered it on pink then again on yellow. Then I cut a piece of striped paper to 4"x5 1/4" and used my Martha Stewart punch on one side of it. Then I layered my pattern paper on yellow card stock. I then used my Stamp-a-ma-jig to stamp my sentiment on the pattern paper. Next, I glued down my pattern paper to my A2 card base. I then cut 3 strips of ribbon and folded them in half and glued them to the back of the layered image so the ends stuck out. Then I glued that piece down and I was done.

Supplies :
  • stamps - image by Great Impressions (#G133), sentiment by Hero Arts Clear Designs Happy Everything
  • paper - KI Memories (It's a Girl Paisley); card stock - Bazzill
  • ink - VersaColor brown, VersaFine black
  • ribbon - unknown

Hope your year is going well so far. Make sure you stop by Jen's blog tomorrow for Sketch Wednesdays - she has some great sketches I hope to play along more this year.

Happy Crafting,
Kimmy

Monday, January 12, 2009

Thank you ATCs

For those of you new to ATCs they are Artist Trading Cards. They measure 2 1/2"x3 1/2". On the back you are to put your information along with what swap it's for or the series name and number them 1 of (how every many you make). Then you trade them with friends or in a swap. They can be used for card fronts, decorating things, or just keep a collection of them. Some people think of them as mini pieces of art - which is really what they are.

I am fairly new to the ATC making. I have only made 3 so far. Of course one of the 3 designs I made 10 of for a swap so I made 12 so far :) This week I had to make some Thank you ATCs for a friend of mine, and here is what I came up with:

This was super easy to make. I stamped and colored in my image with Prismacolor pencils blended with Gamsol (my favorite coloring technique). Then I cut the image out and inked the edges with brown. I then glued the image to the top center of my ATC. Next I cut a strip of beige ribbon and stamped Thank You on it in brown ink. The full sentiment was "Thank you very much" so I had to ink only the "thank you " part. I then glued the ribbon to the lower left corner and that was it.

Supplies :
  • stamp - image by Great Impressions (#G133); sentiment by Hero Arts (#c2633) Thank You Very Much
  • card stock by Bazzill
  • ribbon by Bobbie M. Designs
Have you made any ATCs? I would love to see them! Let me know what you think? Anything you want to see me try - just let me know.

Check in tomorrow to see what else I made with this stamp.

Happy Crafting,
Kimmy

Sunday, January 11, 2009

Fun-Filled Friday Challenge Announcement

A New Year and many more new Fun-Filled Fridays ahead! I am very excited we decided to keep it going. I have some different ideas in mind - new techniques I have been too scared to try and some that I just never heard of. I hope you will decide to play along by participating or giving us some ideas you would like to see us try.

For any of you who may be new to my blog or Jen's blog (Ink n Scrap Habits) I'll get you up to speed on the whole Fun-Filled Friday thing. We are very good friends and started blogging about the same time - we both have been paper crafting for years. We decided to start Fun-Filled Fridays where we would take turns challenging each other ever week to a different technique, sketch, theme or what ever we could think of.

So here's how it works - every Sunday we post the challenge for the week and every Friday we post what we made for the challenge. We love seeing what you come up with and hearing your thoughts on our creations - so feel free to post critiques and comments or even a link to your own version of our challenge. We even have blog candy from time to time. Now on with this weeks Challenge:

This week Jen is challenging me to give Gate Folded cards a try. Can you believe I have been paper crafting for years now and haven't made a gate folded card yet! I even have a Scor Pal - Hello why haven't I done this yet? Make sure you check in Friday to see what we come up with. Since I got my camera all figured out now and my company is gone I should be posting on-time.

As you may have read one of my resolutions this year is to be a better blogger. I am not promising daily posts but I do promise to post much more frequently. I have also been playing with the idea of starting one of these 365 blogs. A bunch of Shackies have already started them. You take a picture everyday and post it on your blog with some thoughts or just tell everyone what your up to. (If you don't know what Shackies are they are members of The Stamp Shack. The Stamp Shack is an online community for rubber stampers) Like I said I haven't decided yet, what do you think? Of course it would be more about me then my creations. Any thoughts? Anyone else out there giving this a try?

Well, since it's Sunday and I don't have to work until 11pm, maybe I can get working on my card now. Oh to finally get ahead with my cards - that would be great!

Happy Crafting,
Kimmy

Saturday, January 10, 2009

Get well wishes (finally)

This weeks fun-filled-Friday challenge was to make a get well card. This is what I came up with:


To make this card I colored in the image with Prismacolor pencils blended with mineral spirits (I got this image from an image swap). Then I cut out the image and layered it on pink card stock. Next, I layered that on purple bling card stock but offset it a big. Next I punched out the wish using my Around the Block punch. I then used the circle nesties to cut out the punched wish and layer it. Then I cut my pattern paper to 4" x 5 1/4". Then I stamped part of my Get well sentiment on pink card stock and layered it on purple bling card stock a little offset to match my image. (The full sentiment was Get Well Soon, so I only inked up the Get Well part that I wanted) Finally I glued all my pieces on the A2 card base. Don't forget to check out Jen's Get Well card.

Supplies :
  • stamps : image - House Mouse by Stampabilities; sentiment - All Night Media "get well soon"
  • card stock : Bazzill, Bazzill Bling
  • paper : KI Memories - Posh Tilted
  • miscellaneous : punch - Around The Block Wish punch embosser; Prismacolor pencils, Gamsol, Versafine black ink, All Night Media purple ink.

***I am so happy to finally post this card! The whole no camera thing has been making me crazy, I have so much to share. And I think I have this camera pretty figured out after playing around with it all day. It's not so bad after all - minus the fact that it's pretty big. ***

So I know it's a bit late, but have you made a get well card lately? I would love to see it. Got any challenges for us for the New Year? Let me know what you would like to see on my blog.

Happy Crafting,
Kimmy

3x3 Wishes!

This weeks Fun Filled Friday challenge was to make 3x3 cards. I have made inchies in the past so this was easier than that, but 3 inches isn't much of a work space. About a month ago I found this adorable clear stamp set at Walmart and thought I could put it to use for this challenge - so I came up with this Warm Wishes card :


To make this card I stamped my image on smooth white card stock with black in and colored it with Prismacolor pencils blended with Gamsol. Then I cut out the image and layered it on purple card stock then again on turquoise card stock. Next I cut my pattern paper to measure 2 5/8" x 2 5/8" and layered that on purple then on turquoise card stock leaving a 1/16" border each time. I then glued the layered pattern paper on my purple 3x3 card base. Next I used Pop Dots to adhere my layered image. Then I added the sentiment "warm wishes" on the inside of the card. Finally I added some stickles to the snowflake on the front and let it dry - I gotta have a little bling:)
Supplies :
  • Stamps - Walmart
  • paper - Reminisce Snowflake Harlequin
  • card stock - Bazzill
  • miscellaneous - black Versafine ink, Prismacolor pencils, Gamsol, Stickles

I had a lot of fun making this card - pretty quick and easy. Have you made a 3x3 card? I would love to see it!

Stay tuned for the next Fun-Filled Friday Challenge Announcement on Sunday. I have a whole day of crafting planned for Saturday so make sure you stop by to see what I have been up to. I have swaps to finish and challenges to fulfill.

Happy Crafting,
Kimmy

Friday, January 9, 2009

I almost have it together

Well I have my card for this week finished ahead of time -yay me! So I am working on pictures for last weeks card and this weeks card. We still haven't bought a new camera but my hubby brought our old camera home from work. I never really learned how to use this one so bare with me it's going to take some getting used to. I also have to re-install the printer so I can download the pics from the memory card which is going to take me a little while. For some reason this older camera didn't have a USB connector. And our printer was giving us some serious problems. If all else fails I'll go back to taking not so great pics with hubby's cell phone. Ugh!!! Sometimes technology doesn't seem to work in my favor.

On the bright side - I'm feeling better and even went to a card class with my girlfriend Kathy. We had fun and the class included a stamp. Today I am planning on finishing up some cards for a sympathy card swap - of course that is if my computer/camera issues don't take all day:) Kathy also reminded me of our challenge to each other this year - 5 Christmas cards a month. Since DH is working tonight and tomorrow night I am hoping to bury myself in my studio and get a little ahead.

Let's talk resolutions. Did you make any this year? If so what are they? Here's mine :
1. Stay with my diet - 30 lbs down and 30 more to go. I wavered a little through the holidays but didn't gain so now I have to get back on track.
2. Get physical! I need to get back into my gym routine. I was very consistently going at least 3 days a week and a day or two at home. I got a minor case of winter blues and can't seem to get motivated again.
3. Blog more frequently. I have a few ideas for weekly posts which should be showing up in the next few weeks - sorry for the delay with company, the holidays, overtime, and getting sick I just had no time - I'm finally moving forward :)
4. GET PUBLISHED!!! I actually have quite a few cards ready for submission but they have not yet made it to the mailbox but soon they will.

Stay tuned for pictures. And cross your fingers I get everything figured out with this camera.

Happy crafting,
Kimmy

Sunday, January 4, 2009

I'm a baaaaad blogger

Well, I want to apologize for what a bad blogger I have been. My parents were staying with us for a couple weeks and left on New Years Day. I has switched some days at work so I could spend more time with them. I have been working everyday since New Years Day and I don't get a day off until Wednesday. I work 12 shifts on midnights so by the time I get home, I really don't have much energy to craft. I also am fighting a cold or something that is really wearing me out. I have pretty much been coming home and sleeping until it's time to get ready for work again. Not a very fun week trust me.

In all my business and not feeling well I still haven't completed my Get Well card so that will be posted as soon as it's finished.

Now for this week challenge - 3x3 cards. This challenge was given to us by our friend Kathy. Kathy doesn't have a blog yet, but is one of our Shackie buddies. She has promised to play along with this challenge too.

Do you have any challenges you would like to see? How about a 3x3 card you could share with us? If so post it in the comments. And I as soon as I am done with my really long week of work (and feeling better) I'll be posting some new stuff.

Happy Crafting
Kimmy